
(Remember to refresh/reload this page for latest changes)
Donate
My station can be remotely operated
via Remotehams.com
The information here is intended
to help you understand
what to do and what NOT to do.
==================
Learn how to use the RemoteHams.com Client
Called RCFORB – Click here!
==================
NO DIGITAL MODES ALLOWED!
The 20-10 Meter Yagi is not available!
Having trouble with the rotator now.
==================
Updated Amplifier Operating Instructions!
Click HERE
==================
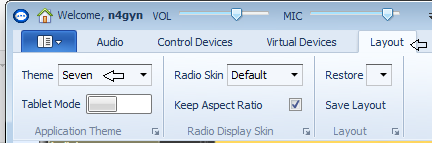
Try this Layout – Theme for RCForb
Click on Layout – click on Theme – select Seven.
IMPORTANT!
If you are working ANY station via my remote, when giving your call sign you MUST give credit to this station.
Example: “This is [your call] via N4GYN Remote”
It is my opinion that it is not fair to the DX station, to think you are operating direct from your own station; NOR is it fair to me for providing you with this remote station.
If I hear you working DX stations without giving credit for this remote I will remove your transmit privileges.
Your First Time on my remote?
Things that you should always do when connecting to my remote:
- Click the ASK button and wait at least 15 seconds.
- Choose the band you wish to use.
- Choose the correct antenna!
80M End Fed for 80 thru 10 meters.
40M Delta Loop for 40 meters.
20-10M Yagi for 20 thru 10 meters (STILL N/A … very sorry)
6M Yagi for 6 meters. - Click the Tune button!
- When you transmit, watch the audio stream at the top of the client. Set your mic level to only occasionally show color there. If you see orange or red colors, you are over-driving the audio. If you do not see any color ever, your mic may be set too low. Use the MIC slider at the top of your client to adjust the level. HINT: once you have moved it with the mouse, you can fine-adjust it with the mouse roller while resting on the slider.
N4GYN PRESENTATION
Some time ago I gave a presentation about RemoteHams.com at our local radio club, GARS (Gwinnett Amateur Radio Society) and it was recorded and put on YouTube. This video is a good way to learn how to operate my station AND set up your station for remote control:
https://www.youtube.com/watch?v=OX1mQG9WqV8&feature=youtu.be
A .pdf version of my presentation can be viewed HERE.
More hints for operating N4GYN Remote:
Please use the newest remote client from RemoteHams.com.
Click Here to download the latest
If you are familiar with how to use the client already, here are some tips to make your operating more enjoyable:
- When using NR, set the “Filter” (drop-down) to FL3 (wide). Then you can adjust the “Filter Width” (slider) to roll off the highs if you have adjacent frequency interference.
- I have had good success using the MNF (button) and then using the associated slider [MNF Freq] to adjust the audio to pass the desired voice while blocking the high-pitched interference.
- I have pulse noise occasionally and NB is very effective to eliminate this kind of noise.
OPERATING CW
When operating CW, you will want to do the following for side-tone while transmitting:
In the CW portion of the Client, click the CONFIG button: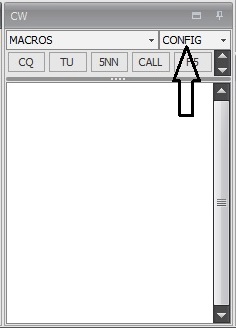 Then Select “Enable Keyboard Sidetone”
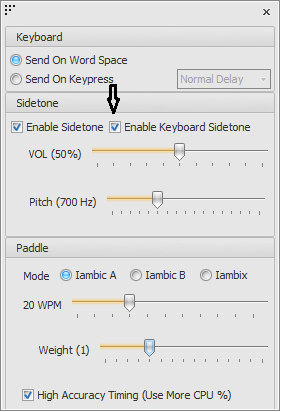
NEW!!
IF you wish to operate using a CW key, here is how to do it:
http://www.whiskeytangohotel.com/2019/04/cw-key-via-usb-port-for-remotehamcom.html
Many thanks to Pat W5WTH for sharing this info
CW OPERATING Hint!
Begin tuning for signals using the Wide filter [FL3].
Once you have found the signal you want, change to the Medium filter [FL2] and center the tone.
Next go to the APF drop-down button (left side) [Audio Peak Filter] and select Wide/Medium/Narrow
IF you have a LOT of interference (adjacent frequency), you can change the regular drop-down filter to Narrow AND change the APF filter to Narrow.
NOTE: The APF filter only works in the CW mode.
RCForb Mobile Client InfoBeam Headings at N4GYN
VOACAP Online
…lets you see the beam headings and propagation for a given location.
You can find it at:http://www.voacap.com/hf/
Works Best in Google Chrome
To find the beam heading for a specific station, do the following:
Write down the callsign of the station.
Look up that callsign in QRZ.com
Write down the station’s QTH (location).
Use VOACAP to get the beam heading…
Below is a snapshot of VOACAP, showing how to get the beam heading for my yagi (when you are on 20 meters and above).
♦ This example is for a contact with any station in France (near Paris). I looked up a station on QRZ.com and clicked on the detail tab to find his Grid Square. Note the arrows & numbers below.
♦ #1 is the red point which you want to move to the N4GYN location (Grid EM84ab).
♦ #2 is the blue point you want to move to HIS/HER location.
♦ #3 is where you click [Prop Wheel] (on right side of the window) to get the graphic showing the time and band for best propagation.
♦ #4 is pointing my HF yagi to the calculated beam heading you should use from MY QTH to get the best signal.
♦ On the left (after you click on Prop Wheel-on the right side) you can see a circle plot of the current propagation for each band at a given time period. If you put your cursor on the hour and band you want, you will see the percentage of the chance of communicating with your QSO party.
♦ On the right side, above Prop Wheel, are other important settings for getting the best results; (mode, power, antennas, etc).
Click on the picture for a larger view….
Buttons and Sliders on N4GYN Remote
| NB | Noise Blanker (Each setting number is a unique algorythm) |
| NR | Noise Reduction (Each setting is a unique algorythm, listen to each one carefully) |
| ANF | Auto Notch Filter (will cancel up to 2 tones automatically) |
| MNF | Manual Notch Filter (adjust with slider on left) |
| Split | Split transmit/receive frequencies. Radio will transmit on SUB vfo frequency and receive on MAIN vfo frequency. |
| A/B | Main versus Sub VFO (used to toggle between them) |
| A>B | Will make VFO “B” equal to VFO “A”. |
| TEST | When selected, TXd will allow you to “intercom” with others logged in WITHOUT transmitting on the air. |
| DW or DV | Dual Watch (if using SPLIT mode), you can listen to both frequencies at once. DW should not be used if VFO “A” and VFO “B” are set for different bands. DV=Diversity (both VFOs at same time on same freq) |
| TXd | Transmit button. The “d” means “digital”. It cuts out the local mic here so sounds in my “Shack” aren’t transmitted. |
| TUNE | Operates K4 tuner |
| Pre Amp | DO NOT USE ON 80 Meters! Preamp #3 only works on 12/10/6 Meters. |
| LOCK | Shows if radio is locked by owner (Users with Admin privileges (A) are able to lock or unlock the controls) |
| ATT | Attenuator (drop-down)=(should use this on 80M at night) |
| APF | Audio Pass Filter – Works only with CW. Helps to remove unwanted noise. |
| NR Lvl | Noise Reduction Level. Use this when NR button is selected. |
| SQL | Squelch slider. Should be at least 18 to mute in FM mode. |
| BAL | Balance slider = When DW is selected, lets you choose audio from VFO “A” [to left] to VFO “B” [to right] or hear both if centered. Works when VFO “B” is enabled (Dual Watch turned ON) |
Section 2
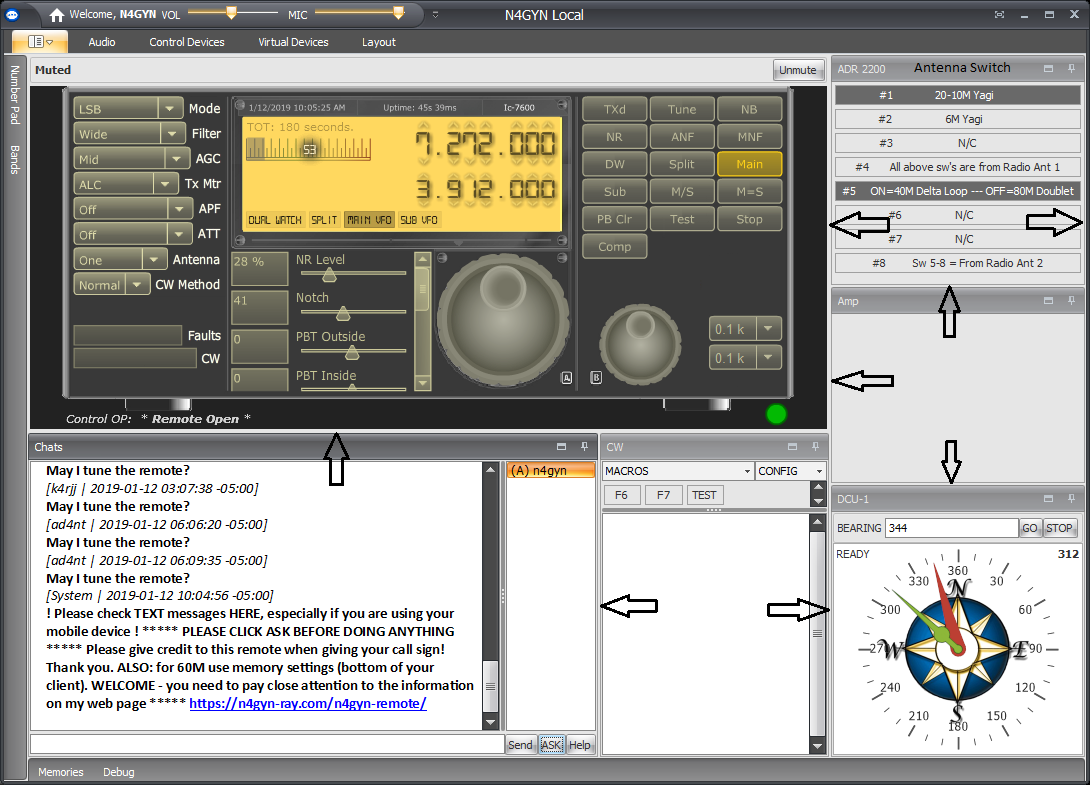
RCForb Client Example
IMPORTANT:
There are 3 sub-sections of the client on the right hand side:
1) The Antenna Switch at the top;
2) The Amplifier Switch in the middle;
3) The Rotator control at the bottom.
These sections of the client can be shaped as you wish. Wide, narrow, large, or small. Click “Layout”, then click “Save Layout” when you are satisfied with it.
ADR 2200 Antenna Switch on the upper right side
NOTE: This and other sub-windows of the client can be resized to suit your taste. Put your cursor on the edge of the ADR-2200 window, look for the double-ended arrow, left click and drag for new size!
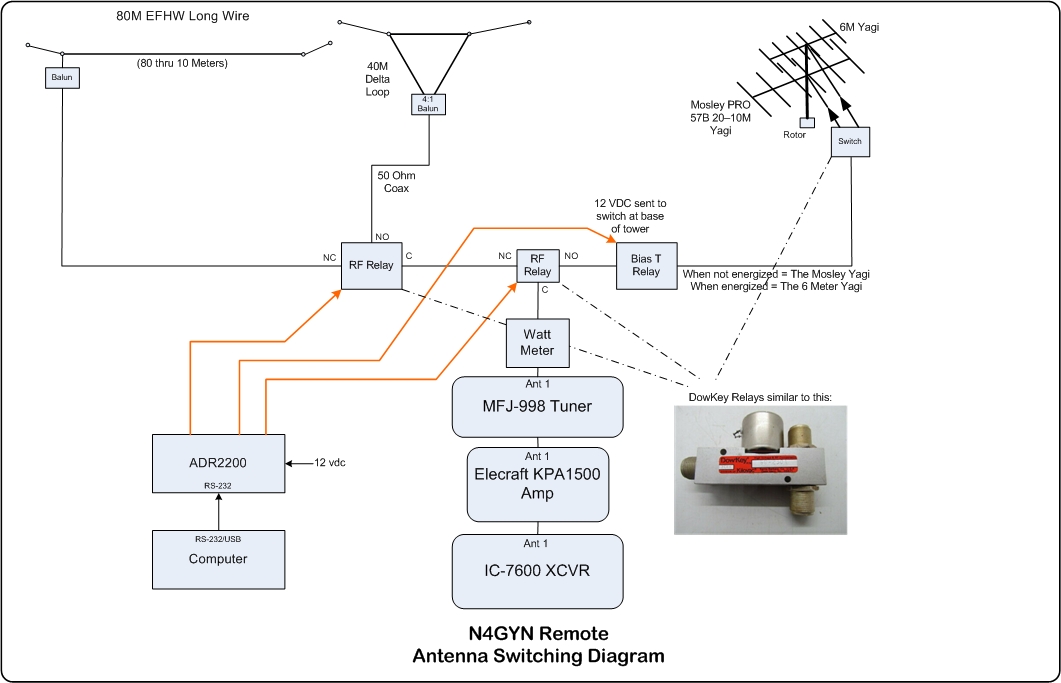
Antenna Switching Diagram
The TOP 4 switches are 1 of 4. In other words, you can select only 1 of the 4 switches. When you select another switch, the previous switch is no longer selected.
The BOTTOM 4 switches are 4 of 4. You can select all 4 at one time. BUT, if you want one of them to NOT be selected, you must select it again… toggle it on and off.
The Antenna Switching System diagram has been revised.
The radio is now the Elecraft k4.
The MFJ-998 is no longer used since the KPA1500 has a built-in tuner.
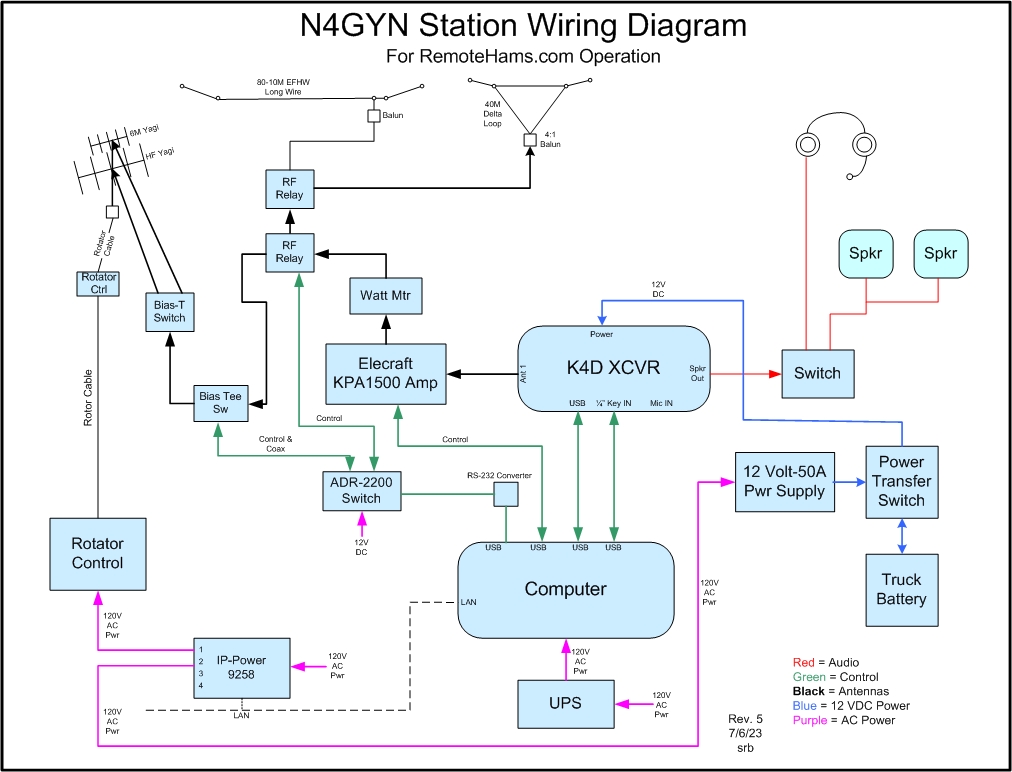
Section 5
N4GYN Station Wiring Diagram
RCForb Client
Remote Stations List
(Stations shaded gray are off-line)
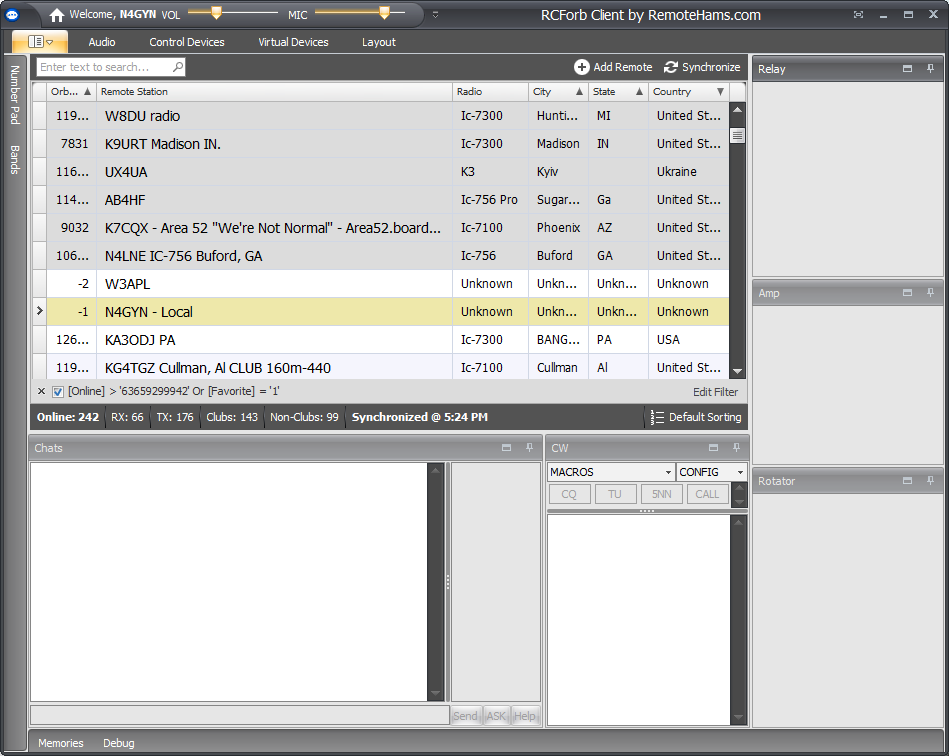
Here is a snapshot of N4GYN Remote via RCForb Client. IGNORE the System message on the bottom left. That is no longer true. Also, the radio is now the Elecraft K4. (RCForb Client uses the same display for all radios.) 
Click to enlarge
—————————————————————————————
Here is a PowerPoint Presentation on How to Set Up your own station on Remotehams.com: